

Tuesday, July 5, 2011


Happy Freedom Redux
Galatians 5:1
"For freedom Christ has set us free; stand firm therefore, and do not submit again to a yoke of slavery."
LissaPs I'm sorry for everyone who keeps getting this sent. I'm TRYING to get the picture to post when I send it through my phone. Ive been trying something new every time.
Monday, June 6, 2011

Been doing a lot this week! I can't believe it's finally the last week of school. My mother's birthday was on Monday so I drew her a little cake on a card.
 I also started making all these pillows. The Bethlehem Star pillow is for me. I made the star over a year ago just to see if I could. I had grand plans to make a picture entirely sewn out of fabric that would incorporate the star. Then I realized I wouldn't want to hang something like that on my wall! So finally, I have a completely normal, completely lovely accent pillow for my couch. And it has a little lace on the back. Just 'cause. The two pillows in the bottom picture are some I made for my mother's birthday. It's an amazing Schumacher fabric. It was so beautiful - it was quilted with tiny little diamonds, and over this beige background, was stitched a "center border" motif with loops and flowers. I placed the center of the motif more on the side on my pillows so you could see some flowers too. My sister gave me a great big sample rectangle and it all went on these pillows.
Here are some shots of the bulletin board I painted several weeks ago. It's very aqua. I'm still getting used to it. I gave myself a little pat on the back for choosing a reddish orange for the accent. It's just out of my comfort zone. I like that bit. I'm sorry the pictures are so small. When I shrink them and make a tiled arrangement it helps me upload them. I drew the stencil but ended up only cutting out a few bits. I stencilled the bits on, and then added the rest by hand, like all those tiny leaves. There's a little butter-moth in the corner that ended up being covered by the calendar. This is the only spot in the house I can really put the calendar and still write on it. I'm keeping lists and a couple of bible verses on there too.
I'm so excited! On Sunday after church we are going to Dallas-Fort Worth to visit my parents (Granny & Grandfather) and my mom's dad (Papa Pete!). Papa and my Mom have planted a large vegetable garden - something my kids don't have any experience with. I am super-excited!
To Do before I go:
Finish all projects for My and Rebecca's secret project.
Sew a dress out of white eyelet (this was supposed to be for Easter, and then Mother's Day. I am determined to wear it this summer. Determined.)
Make invitations for Peter's birthday out of origami paper, blank cards, and a photoshopped Team UmiZoomi picture.
Let the madness begin. (As in crazy, not angry - hopefully!)
Monday, May 30, 2011
A few little tips...
I found a wonderful book at the library called:
"Pretend Soup"(and this link has lots of pictures!) It's a cookbook you can use with your toddlers. I let Peter pick out a recipe to make and he picked "Carrot Pennies." We made them a couple of times and gobbled them up. He's not really interested in making them any more, but when they show up at dinner he's thrilled to eat them. Maybe knowing how they're made (with butter and brown sugar) makes him feel like he made them every singe time. James likes them too and I think he helped make them once. There's at least one more cook book compiled by the same lady called "Salad People." I just can't say enough about this wonderful book. Peter wanted to read it before bedtime. Every recipe, and all the children's comments that are sprinkled throughout the book. Each recipe has simple pictures that represent each step. Things like "stir", "flip", "pour in." He wanted me to read every step of every recipe!

Tip #1 If your toddlers need some buildings to rampage through, house lego men, or use as target practice here is an easy recipe for a house made from a cereal box.
Cut where I've indicated. I cut the top and one side together. Then you can use the top and that side (brown side up this time) to draw the other side. You won't have to worry about drawing or cutting perfectly because that way, they'll match.
You should have the sides (the part with all the vitamin info) sticking up. Those fold down toward the slanted roof sides. Use big old masking tape (or something) to tape down.
If you want a prettier house (that doesn't say, for example, Raisin Bran Crunch across the front). I suggest you dismantle the box. Turn it inside out, then follow the instructions. Then you can paint it!
Tip #2 The pot rack makes an excellent drumset.
 Tip #3 Quesadillas made from colby jack and apples (I think these are pink ladies) are actually quite delicious.
 Tip #4 If you need to measure how long you want a skirt or dress to be, and there's no one around to help you. Draw a mark on your leg with a washable marker. Line up your measuring tape with the mark (I lined mine up with the 5" spot so I had to subtract 5" at the end). Tape it on your leg. Roll the tape up to your desired waist and read the number! Voila!
 Here's a close-up. Peter takes a nap nearly every day. All the nap post-it's are different colors so they look pretty all lined up. I try not to have any colors that are the same next to each other. Sometimes we have to move something to a different day and it happens. We don't worry about it. We talk about what today is, what tomorrow is, and what yesterday was (what day of the week). Then we sing the days of the week song to the tune of "Twinkle Twinkle Little Star."
 I think it helps Peter to know what to expect during the day. Sometimes there's a dinner menu post-it and sometimes there's not. I do think Mark and James like to know what dinner will be so I've tried to do it more often. The main thing is that there's something to look forward to almost every day, and that toddlers can learn that sometimes we have to be flexible and move something over to a different day. Peter quite likes moving things around actually. The fun of that helps him to be flexible. He really liked the lunch post-it (yellow, near right) and ended up moving it down several days and requesting pb&j and an apple for lunch so it could look like the picture (that's a fold-over sandwich). He was also much more excited about going to the Parcel Store to mail Granny's present because the post it showed it getting to her (light green next to the sandwich and apple). Peter likes to move the "Today is" star over to the next day (whenever we remember that is).
 The whole thing is just a poster board and colorful Post-It notes. I drew a top "border", measured it, divided by 7 (roughly 4" a column), and divided it into seven sections. I wrote a day of the week in each section. I left the majority of the poster without any lines, and it helps us not worry if our post-its are crooked. I did spend the money on post-it's which went against the grain, but I decided to invest in it as a learning experience. Also the supplies are versatile and if it hadn't worked we could have used everything for something else!
"Pretend Soup"(and this link has lots of pictures!) It's a cookbook you can use with your toddlers. I let Peter pick out a recipe to make and he picked "Carrot Pennies." We made them a couple of times and gobbled them up. He's not really interested in making them any more, but when they show up at dinner he's thrilled to eat them. Maybe knowing how they're made (with butter and brown sugar) makes him feel like he made them every singe time. James likes them too and I think he helped make them once. There's at least one more cook book compiled by the same lady called "Salad People." I just can't say enough about this wonderful book. Peter wanted to read it before bedtime. Every recipe, and all the children's comments that are sprinkled throughout the book. Each recipe has simple pictures that represent each step. Things like "stir", "flip", "pour in." He wanted me to read every step of every recipe!

Tip #1 If your toddlers need some buildings to rampage through, house lego men, or use as target practice here is an easy recipe for a house made from a cereal box.
Cut where I've indicated. I cut the top and one side together. Then you can use the top and that side (brown side up this time) to draw the other side. You won't have to worry about drawing or cutting perfectly because that way, they'll match.
You should have the sides (the part with all the vitamin info) sticking up. Those fold down toward the slanted roof sides. Use big old masking tape (or something) to tape down.
If you want a prettier house (that doesn't say, for example, Raisin Bran Crunch across the front). I suggest you dismantle the box. Turn it inside out, then follow the instructions. Then you can paint it!
Tip #2 The pot rack makes an excellent drumset.

 Tip #3 Quesadillas made from colby jack and apples (I think these are pink ladies) are actually quite delicious.
 Tip #4 If you need to measure how long you want a skirt or dress to be, and there's no one around to help you. Draw a mark on your leg with a washable marker. Line up your measuring tape with the mark (I lined mine up with the 5" spot so I had to subtract 5" at the end). Tape it on your leg. Roll the tape up to your desired waist and read the number! Voila!
Here is the weekly schedule that Peter and I are doing for fun together, almost every day. Stars are for "Today" and anything that we think is extra special, like the Library. Or you can see on Monday there is No School! It's Memorial Day and also Granny's birthday.
 Here's a close-up. Peter takes a nap nearly every day. All the nap post-it's are different colors so they look pretty all lined up. I try not to have any colors that are the same next to each other. Sometimes we have to move something to a different day and it happens. We don't worry about it. We talk about what today is, what tomorrow is, and what yesterday was (what day of the week). Then we sing the days of the week song to the tune of "Twinkle Twinkle Little Star."
 I think it helps Peter to know what to expect during the day. Sometimes there's a dinner menu post-it and sometimes there's not. I do think Mark and James like to know what dinner will be so I've tried to do it more often. The main thing is that there's something to look forward to almost every day, and that toddlers can learn that sometimes we have to be flexible and move something over to a different day. Peter quite likes moving things around actually. The fun of that helps him to be flexible. He really liked the lunch post-it (yellow, near right) and ended up moving it down several days and requesting pb&j and an apple for lunch so it could look like the picture (that's a fold-over sandwich). He was also much more excited about going to the Parcel Store to mail Granny's present because the post it showed it getting to her (light green next to the sandwich and apple). Peter likes to move the "Today is" star over to the next day (whenever we remember that is).
  The whole thing is just a poster board and colorful Post-It notes. I drew a top "border", measured it, divided by 7 (roughly 4" a column), and divided it into seven sections. I wrote a day of the week in each section. I left the majority of the poster without any lines, and it helps us not worry if our post-its are crooked. I did spend the money on post-it's which went against the grain, but I decided to invest in it as a learning experience. Also the supplies are versatile and if it hadn't worked we could have used everything for something else!
A beautiful flower from mother's day. James pick them out - aren't they lovely?

Thursday, May 26, 2011
And the winner is...
Okay for my grand first give-away, I got a total of 2 comments! Bwahahaha! So here we go. Heads it's Micah, Tails it's Corrie. [flips coin]

And Micah it is! Which is great for me, because I can just give it to her at the party on Saturday! Hmmm that reminds me. Need to go get a present...but I'm thinking her soon-to-be 10 year old wouldn't like anything embroidered. No. Probably not. Here are some recent pictures for my dear family. Have a happy Memorial Weekend Everybody!


Saturday, May 21, 2011
First time for everything...

I'm doing a giveaway today, and I've never done this before. Not nearly as exciting as it sounds - for me anyway. Lot's more exciting to win. So I'm offereing for the giveaway a funky retro trim I found at our local Pennywise. I found it on some curtains. It's not all one piece unfortunately but there's rather a lot of it. I cut the faded red curtain fabric off - trust me, no loss. And there was very little fading on this trim! It's really wide. You wouldn't be getting it except it's just not in colors I use very much: red, orange, pink, green. 


I love shopping at Pennywise because they sell people's old sewing patterns for a quarter and they usually have a fabric bin! Awesome! I've picked up, this year alone some red and white striped fabric (really really big stripes) that I may make piping out of because I loved the piping on ikatbag's shortall pattern. Another score (to me) was two cute polka dot cups. I also troll the sheets and pillowcases section for those bright retro florals that are getting so trendy. Which is where I found the faded red curtains that had this wonderful super-bright trim. I just can't describe how bright these colors are. There are two lengths of about 10' each. It would work beautifully on a dress (here's one to copy from Modcloth), or on a roman blind (Little Green Notebook has a neat tutorial on how to make a roman blind from a cheap mini-blind). Oh dear. Now I wish I was keeping it. (Sigh.)All you need to do to enter is leave a comment on my skirt tutorial from yesterday (USA residents only please). Be sure that I can click on your name to get back to you, or leave your address written out (for example: patthebunny(at)fictionalcharacter(d0t)com ). Then I'll randomly generate my number for whoever comments! Here's a tip. I usually average about 2 comments. So you have a much better chance of winning than usual! Please leave only one comment. I will close the give-away on Wednesday at 9pm (CST).
Bon Chance!
Friday, May 20, 2011
Breezy Braided Beach Skirt Tutorial

Welcome everyone from Hideous Dreadful Stinky! I am so honored to be a guest blogger for the Summer of No Pants. Marigold writes one of my favorite blogs. As a mother of three boys her tough as Rubbermaid blog is a breath of fresh air for this mom.
Also tomorrow I'll be doing a giveaway. It was just too much with this very long post. Come back for that! So without further ado (well who are we kidding? There are at least 3 more pictures before the tute really starts, but this parenthetical isn't helping us get there eh?) the:

This is more than just your average drawstring skirt! Although I love a good adjustable drawstring skirt (one size fits all!) I hate having to adjust it every time I want to take it off. Also three boys have left me with not much waist and I find that a tight enough drawstring can cut into my tummy and be really uncomfortable. I have found a remedy for both problems so this will be a comfortable and adjustable option for your Summer of No Pants!


 Tools:
Rotary Cutter
Ruler
Cutting Mat
Fabric Marker
Large safety pin
Sewing Machine
Supplies:
1 3/4 yard cotton knit
5/8" Elastic (something strong)
Matching Thread
 1. Cutting the pieces
Fold the material in such a way that you are cutting all the way across the fabric selvage-to-selvage. All cuts will be made in this way. So they will all be approx. 45" by whatever-I-tell-you. (If you want to do 60" fabric you'll have to do the math yourself!)
Cut pieces that are:
26 1/4" (back)
25" (front)
3 1/4" (drawstring casing for front)
1"
1"
1"

 2. Turning under
Turn under 1/4" and then 1/4" again to make a nice edge. Do this on the following (this is the boring part):
One long side of the 26 1/4" piece (the 45" side)
One long side of the 25" piece (the 45" side)
Of the 3 1/4" piece, first the long sides, the the short sides
Cut the 3 1/4" piece in half so you have two pieces that are 3 1/4" by approx. 22" and are finished on three sides.

 3. Making casings
The Front: (if, like me, you've pinned nothing so far - this is where you should start pinning!)Pin the two 3 & 1/4" pieces so that they match up with the turned edge of the 25" piece. Put those raw unfinished edges on the selvage and leave a little 2" gap in the middle between those nice finished short ends.

This is going to be the casing that will hold the three drawstrings. I matched the casing edge to the line of the stitches so you can see the two layers a little bit.
 Sew down the lower side of the casing the same way. Now you'll need to measure the previously 3 & 1/4" casing to see what it measures from stitches to stitches.
 Remember those three 1" strips? Stretch those girlies all the way out till they curl up! Cut all three strips in half so you have six. Get that big safety pin and use it to thread one strip through each of those parallel casings you just sewed! Let them hang down long in the middle and knot them together just to be safe. On the unfinished side edges, have those three strips stick out a tiny bit. Pin them, and then sew them down. When you sew the side seams later just use a bigger seam allowance so that bit doesn't show.
 The Back:
You are now going to make a casing for the elastic along the long nicely turned side of the 26 & 1/4" piece. Do that however you want. But on one side sew the elastic down and on the other side leave the casing open so you can adjust the elastic when we get to that part.
This is how I do it.
First put the safety pin on the end of the elastic.
Lay the elastic down along the turned edge on one side. Fold that baby over just as snug as you like with the elastic now inside the fold. There should be just enough looseness so you can pin along the edge of your folded-casing without catching the elastic in your pinning. Pin all the way down the elastic. When you get to the end of the elastic, slide it down further so you can use it to gauge your folds. Keep sliding and folding and pinning, sliding and folding and pinning until you get to the other side.
This is how I do it.
First put the safety pin on the end of the elastic.
Lay the elastic down along the turned edge on one side. Fold that baby over just as snug as you like with the elastic now inside the fold. There should be just enough looseness so you can pin along the edge of your folded-casing without catching the elastic in your pinning. Pin all the way down the elastic. When you get to the end of the elastic, slide it down further so you can use it to gauge your folds. Keep sliding and folding and pinning, sliding and folding and pinning until you get to the other side.
 Let the elastic stick out a little. Sew down the elastic from the top of the fold to the pinned edge, then turn, sewing along where you pinned. Don't catch the elastic!
 4. Construction
Sew the Side Seams Almost. Pin the front to the back, right sides together and...
a) On the side where the back elastic is sewn down - sew the side seam all the way top to bottom using a large enough seam allowance that all those other side seams don't show.
b) On the side where the elastic is loose sew from just UNDER the elastic casing all the way to the bottom.
 Fitting the Waist and Pinning the Elastic Down:
Go lock yourself in your bathroom with your pincushion and make the gaping hole of a waistband fit around you. Pull the front drawstrings tight and tie them. Hold the "open" side together with one hand and pull the elastic out until the skirt fits you. Pin it and adjust the gathers. Adjusting the gathers may loosen the skirt. Pull the elastic out again, keep working it until it looks how you like and (this is rather important) doesn't fall off!
Before you go back to sew down the elastic where you pinned it, take the skirt off and put on some pants!
Sew the side seam the rest of the way up - sewing that pinned elastic down at the same time.
Hems: Many people leave the hem of a cotton knit skirt like this unfinished. That's what I've done here. If you don't like this you can turn the edge under a 1/4 of an inch twice as we did on the other nice edges, or you could do a more traditional hem by turning 1/4 of an inch once and sewing on the machine and then turning under one inch or more and hand-sewing a hemstitch.
Either way cotton knit skirts like this are not expected to be perfectly hemmed parallel to the ground. A little variation is normal in a store bought skirt so you can get away with it here.
 Braid those drawstrings and tie them in a knot before you reach the end! Pretty pretty pretty!
Or don't braid them and leave them all stringy and Blue Lagooney! Whatever you want!
Now go to the beach with your kiddoes!
Come back tomorrow for the give away!
Monday, May 9, 2011
Hankies for Natalie
I've been working on these for a friend who is getting married on Saturday. I'm pretty sure none of her bridesmaids read my blog so we're okay! I was so excited to get to do this for her because she is so special and friendly, and well to be honest I really like her so I'm trying ingratiate myself. Yep, once again, using handcrafts to manipulate people into being my friend. And if you gotten something embroidered from me, I feel that way about YOU too.
I'm also using this post to test the "small", "medium", and "large" settings on blogger.
I'm also using this post to test the "small", "medium", and "large" settings on blogger.

This one was my favorite. I love how the little butterfly turned out. What I did to create the designs was very simple. I drew squares that were the size I wanted the letters to be. Using a pencil I wrote the letter in the square using pretty handwriting. If I didn't like it I erased the bit that needed help fixed it. In the end I went over it in pen. I put a paper over that and traced my letter adding flowers and clover and leaves. If I didn't like it, I just traced a new one. It really helped to have the template in pen under there ready to give me a fresh start. When I was satisfied I went over the new design in pen so I could trace that on fabric with a fabric marker. Here they are all stacked up and ready to go.
 I have to tell you all about my wonderful Mother's Day.
 What I did to create the designs was very simple. I drew squares that were the size I wanted the letters to be. Using a pencil I wrote the letter in the square using pretty handwriting. If I didn't like it I erased the bit that needed help fixed it. In the end I went over it in pen. I put a paper over that and traced my letter adding flowers and clover and leaves. If I didn't like it, I just traced a new one. It really helped to have the template in pen under there ready to give me a fresh start. When I was satisfied I went over the new design in pen so I could trace that on fabric with a fabric marker. Here they are all stacked up and ready to go.
 I have to tell you all about my wonderful Mother's Day.
I got breakfast in Bed (James' idea) with a card from Mark and one card for all the three boys - they all wrote their names in it! Okay not Phillilp.
We went to church and heard a wonderful sermon on Hannah (from Samuel 1 & 2) and not idolizing motherhood (or anything else). We were also part of the baby dedication and Phillip was dedicated.
Afterwards we went for Chinese food. Yummy and not too pricey! It was not a buffet (we love chinese buffets too!) so the boys had a menu experience - it just all seemed a little fancier than we usually do. I don't know why we've been places with menus before...
When we came home we all put on flip flops and went to the beach for a photo shoot! You'll see those pictures soon on my "Breezy Braided Beach Skirt" Tutorial.
After the beach we stopped by LaKing's a candy and soda shop on The Strand in Galveston. (Granny's Treat). We headed home for toast and milk and showers. And THAT was my awesome Mother's Day.
Happy Mother's Day to me! Here I am with my three wonderful boys.Unseen is my wonderful awesome (sexy) husband taking the picture!

Thursday, May 5, 2011
Space Craft and Milk Bag
All kinds of fun going on here at my house. This craft for one. I wish wish wish I could post the link to the site where I first saw this. But I forgot it and can't find it anywhere. In my head it's associated with Celebrate the Boy but it doesn't seem to be one of their official links. Argh.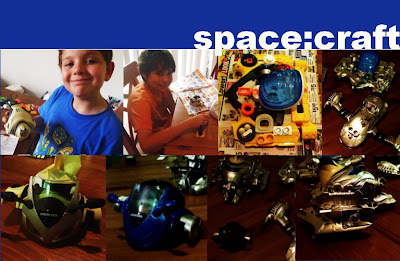 James and I dismantled as many broken toys and stuff as we could find and kept all the outside plastic pieces. Then, we went to Home Depot and got some adhesive (and two cans of spray paint). We used an epoxy that came in two tubes that squirt as one. Pretty Cool. Thanks also to Robert for the advice on epoxy!
Then when his sleepover friend arrived - they played Wii. Finally I couldn't take it any more so I made them build space ships. Yes, I was more excited than they. But they were jazzed about the results.
I have also wanted to make this reusable grocery bag set. Especially the milk and meat ones. Here is my attempt. Note to self: actually follow directions next time instead of looking at the picture and thinking: "okay that looks pretty simple/easy/fun." I mean honestly how many times has that thought gotten me in to trouble? I'm pretty sure getting various body parts stuck in things, mangling clothes to make them "better" and at least one son - all had that in common.
But anyway, I'm happy with it.
I'll do better with the meat bag.
And I think it's super cool that I made the plastic fabric out of melted grocery bags!
 Happy Cinco De Mayo Everyone! I have to go make a breezy beach skirt for the:
 James and I dismantled as many broken toys and stuff as we could find and kept all the outside plastic pieces. Then, we went to Home Depot and got some adhesive (and two cans of spray paint). We used an epoxy that came in two tubes that squirt as one. Pretty Cool. Thanks also to Robert for the advice on epoxy!
Then when his sleepover friend arrived - they played Wii. Finally I couldn't take it any more so I made them build space ships. Yes, I was more excited than they. But they were jazzed about the results.
I have also wanted to make this reusable grocery bag set. Especially the milk and meat ones. Here is my attempt. Note to self: actually follow directions next time instead of looking at the picture and thinking: "okay that looks pretty simple/easy/fun." I mean honestly how many times has that thought gotten me in to trouble? I'm pretty sure getting various body parts stuck in things, mangling clothes to make them "better" and at least one son - all had that in common.
But anyway, I'm happy with it.
I'll do better with the meat bag.
And I think it's super cool that I made the plastic fabric out of melted grocery bags!
 Happy Cinco De Mayo Everyone! I have to go make a breezy beach skirt for the:
at which I will be a guest blogger!
Wednesday, April 20, 2011
Fairest and Fair
Here is our "Eastivity Scene!" Starting on Sunday, Jesus entered the city riding on a donkey. Our figurine wouldn't ride his donkey. The people laid down palms and their coats for Jesus. He went to the Temple. You can see the people ready to sell sheep and stuff. And he cleaned it out!
The next day he cursed the fruitless fig tree as a symbol of the Temple empty of prayer and praise. So the last picture is Jesus happy because we filled up the temple with fruit: things we praise God for! I didn't take pictures of it, but the boys also decorated the two greatest commandments (the Diamond Rule, and the Golden Rule) because Jesus quoted them during this visit to the Temple.


We took a sort of break on the Holy Week Activities on Tuesday because Jesus was teaching end-times things in the temple. Just a little over our heads this year. We will start back up
on Wednesday with Judas going to the Pharisees, and anything else that happened on Wednesday.


The next day he cursed the fruitless fig tree as a symbol of the Temple empty of prayer and praise. So the last picture is Jesus happy because we filled up the temple with fruit: things we praise God for! I didn't take pictures of it, but the boys also decorated the two greatest commandments (the Diamond Rule, and the Golden Rule) because Jesus quoted them during this visit to the Temple.


We took a sort of break on the Holy Week Activities on Tuesday because Jesus was teaching end-times things in the temple. Just a little over our heads this year. We will start back up
on Wednesday with Judas going to the Pharisees, and anything else that happened on Wednesday.
And finally, here are some pictures of the Boyscout Fair! You can see pictures of James learning to fold The Flag, crossing a log bridge, climbing a rockwall, making rope, and driving a Lego Robot. Peter got to twist James' rope a little, they ate lunch under a makeshift stroller/chair/blankey tent, got to shoot rubber band guns, and make a 2x4 trail through a "jungle." My Cub Scout had a great time, and Pete and Phillip did well too!


Subscribe to:
Posts (Atom)